Expose loadbalanced Kubernetes services with BGP (Cilium)
This blog post shows you how your Kubernetes Service can be exposed to the outside world, using Cilium and BGP.
Cilium
Cilium is an open source project to provide networking, security and observability for cloud native environments such as Kubernetes clusters and other container orchestration platforms.
BGP
Border Gateway Protocol (BGP) is a standardized exterior gateway protocol designed to exchange routing and reachability information among autonomous systems (AS) on the Internet. BGP is classified as a path-vector routing protocol. It makes routing decisions based on paths, network policies or rule sets configured by a network administrator. Source: Wikipedia
You can compare BGP somewhat with the postal service, where a distribution center can be seen as an AS which is responsible for certain postal codes. When you send a letter to your friend on the other side of the country, your local postal office does not deliver it directly to your friend, but they know based on the postal code, to which distribution center they should send it. And from that distribution center it probably will be send to another distribution center before it is handed over for local delivery in the city of your friend.
Cilium and BGP
In release 1.10, Cilium integrated BGP support using MetalLB, which enables it to announce Kubernetes Service ip addresses of the type LoadBalancer using BGP. The result is that services are reachable from outside the Kubernetes network without extra components, such as an Ingress Router. Especially the ‘without extra components’ part is fantastic news, since every component adds latency - so without those less latency.
Lab environment
First let me explain how the lab is set up and what the final result will be.
The lab consists of a client network (192.168.10.0/24) and a Kubernetes network (192.168.1.1/24). When a Service gets a LoadBalancer ip address, that address will be served from the pool 172.16.10.0/24. In our lab, the following nodes are present:
| Name | IP addresses | Description |
|---|---|---|
| bgp-router1 | 192.168.1.1/24 (k8s network), 192.168.10.1/24 (client network) | The BGP router |
| k8s-control | 192.168.1.5/24 (k8s network), 192.168.10.233/24 (client network) | Management node |
| k8s-master1 | 192.168.1.10/24 (k8s network) | k8s master |
| k8s-worker1 | 192.168.1.21/24 (k8s network) | k8s worker |
| k8s-worker2 | 192.168.1.22/24 (k8s network) | k8s worker |
| k8s-worker3 | 192.168.1.23/24 (k8s network) | k8s worker |
| k8s-worker4 | 192.168.1.24/24 (k8s network) | k8s worker |
| k8s-worker5 | 192.168.1.25/24 (k8s network) | k8s worker |
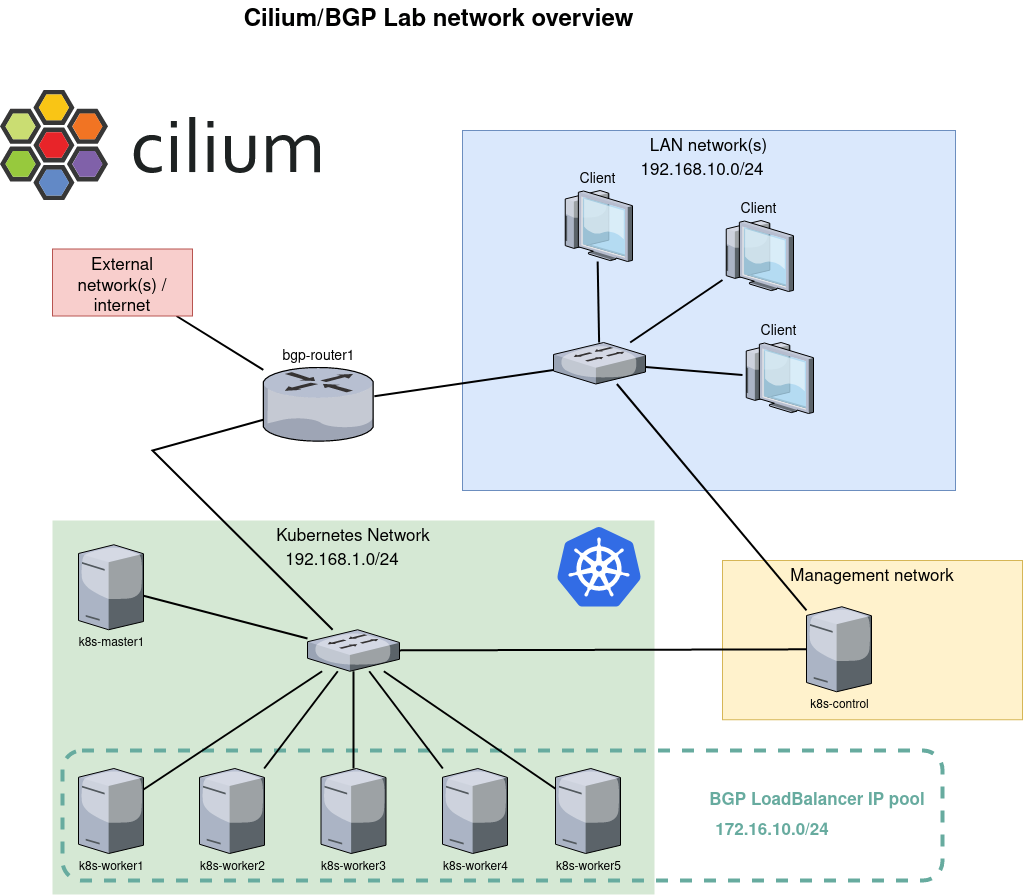
After all the parts are configured, it will be possible to reach a Service in the Kubernetes network, from the client network, using the announced LoadBalancer IP address.
Lab configuration
BGP router
The router is a Red Hat 8 system with three network interfaces (external-, kubernetes- and client network) with FRRouting (FRR) responsible for handling the BGP traffic. FRR is a free and open source Internet routing protocol suite for Linux and Unix platforms. It implements many routing protocols like BGP, OSPF and RIP. In our lab only BGP will be enabled.
dnf install frr
systemctl enable frr
firewall-cmd --permanent --add-port=179/tcp
echo 'net.ipv4.ip_forward=1' > /etc/sysctl.d/01-sysctl.conf
sysctl -w net.ipv4.ip_forward=1
After installing FRR, the BGP daemon is configured to start by changing bgpd=no to bgpd=yes in the configuration file /etc/frr/daemons, using the following BGP configuration in /etc/frr/bgpd.conf
log syslog notifications
frr defaults traditional
!
router bgp 64512
 no bgp ebgp-requires-policy
 bgp router-id 192.168.1.1
 neighbor 192.168.1.10 remote-as 64512
  neighbor 192.168.1.10 update-source enp7s0
 neighbor 192.168.1.21 remote-as 64512
  neighbor 192.168.1.21 update-source enp7s0
 neighbor 192.168.1.22 remote-as 64512
  neighbor 192.168.1.22 update-source enp7s0
 neighbor 192.168.1.23 remote-as 64512
  neighbor 192.168.1.23 update-source enp7s0
 neighbor 192.168.1.24 remote-as 64512
  neighbor 192.168.1.24 update-source enp7s0
 neighbor 192.168.1.25 remote-as 64512
  neighbor 192.168.1.25 update-source enp7s0
 address-family ipv4 unicast
  neighbor 192.168.1.10 next-hop-self
  neighbor 192.168.1.21 next-hop-self
  neighbor 192.168.1.22 next-hop-self
  neighbor 192.168.1.23 next-hop-self
  neighbor 192.168.1.24 next-hop-self
  neighbor 192.168.1.25 next-hop-self
 exit-address-family
!
 address-family ipv6 unicast
 exit-address-family
!
line vty
In the config file above the AS number 64512 is used, which is reserved for private use. The Kubernetes master node and worker nodes are configured as neighbor. The ip address of the router’s interface in the Kubernetes network (192.168.1.1) is used as router id.
After the configuration above is applied and the FRR daemon is started using the systemctl start frr command, the command vtysh -c 'show bgp summary' shows the following output.
IPv4 Unicast Summary:
BGP router identifier 192.168.1.1, local AS number 64512 vrf-id 0
BGP table version 0
RIB entries 0, using 0 bytes of memory
Peers 6, using 86 KiB of memory

Neighbor        V         AS   MsgRcvd   MsgSent   TblVer  InQ OutQ  Up/Down State/PfxRcd   PfxSnt
192.168.1.10    4      64512         0         0        0    0    0    never       Active        0
192.168.1.21    4      64512         0         0        0    0    0    never       Active        0
192.168.1.22    4      64512         0         0        0    0    0    never       Active        0
192.168.1.23    4      64512         0         0        0    0    0    never       Active        0
192.168.1.24    4      64512         0         0        0    0    0    never       Active        0
192.168.1.25    4      64512         0         0        0    0    0    never       Active        0

Total number of neighbors 6
Kubernetes and Cilium
It goes beyond the scope of this blog to explain how to install the Kubernetes nodes and the Kubernetes cluster. For your information: in this lab Red Hat 8 (minimal installation) is used as the operating system for all the nodes and Kubeadm was subsequently used to set up the cluster.
The Cilium Helm chart version v1.10.5 is used to install and configure Cilium on the cluster, using these values:
debug:
  enabled: true
externalIPs:
  enabled: true
hostPort:
  enabled: true
hostServices:
  enabled: true
kubeProxyReplacement: strict
k8sServiceHost: 192.168.1.10
k8sServicePort: 6443
nodePort:
  enabled: true
operator:
  replicas: 1
bgp:
  enabled: true
  announce:
    loadbalancerIP: true
hubble:
  enabled: true
  metrics:
    enabled:
      - dns
      - drop
      - tcp
      - flow
      - port-distribution
      - icmp
      - http
  listenAddress: ":4244"
  relay:
    enabled: true
  ui:
    enabled: true
To get Cilium up and running with BGP, only the bgp key and subkeys are needed from the settings above. The other settings are used to get a fully working Cilium environment with, for example the Hubble user interface.
Expose a service
When Kubernetes is running and Cilium is configured, it is time to create a deployment and expose it to the network using BGP. The following YAML file creates a Deployment web1, which is just a simple NGINX web server serving the default web page The file also creates a Service web1-lb with a Service type LoadBalancer. This results in an external ip address that is announced to our router using BGP.
---
apiVersion: v1
kind: Service
metadata:
  name: web1-lb
spec:
  type: LoadBalancer
  ports:
  - port: 80
    targetPort: 80
    protocol: TCP
    name: http
  selector:
    svc: web1-lb

---
apiVersion: apps/v1
kind: Deployment
metadata:
  name: web1
spec:
  selector:
    matchLabels:
      svc: web1-lb
  template:
    metadata:
      labels:
        svc: web1-lb
    spec:
      containers:
      - name: web1
        image: nginx
        imagePullPolicy: IfNotPresent
        ports:
        - containerPort: 80
        readinessProbe:
          httpGet:
            path: /
            port: 80
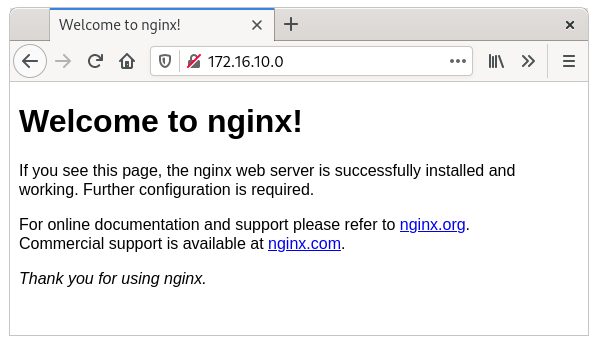
After applying the YAML file above, the command kubectl get svc shows that Service web1-lb has an external ip address:
NAME         TYPE           CLUSTER-IP       EXTERNAL-IP   PORT(S)        AGE
kubernetes   ClusterIP      10.96.0.1        <none>        443/TCP        7d3h
web1-lb      LoadBalancer   10.106.236.120   172.16.10.0   80:30256/TCP   7d2h
The address 172.16.10.0 seems strange, but it is fine. Often the .0 address is skipped and the .1 address is used as the first address. One of the reasons is that in the early days the .0 address was used for broadcast, which was later changed to .255. Since .0 is still a valid address MetalLB, which is responsible for the address pool, hands it out as the first address. The command vtysh -c 'show bgp summary' on router bgp-router1 shows that it has received one prefix:
IPv4 Unicast Summary:
BGP router identifier 192.168.1.1, local AS number 64512 vrf-id 0
BGP table version 17
RIB entries 1, using 192 bytes of memory
Peers 6, using 128 KiB of memory

Neighbor        V         AS   MsgRcvd   MsgSent   TblVer  InQ OutQ  Up/Down State/PfxRcd   PfxSnt
192.168.1.10    4      64512       445       435        0    0    0 03:36:56            1        0
192.168.1.21    4      64512       446       435        0    0    0 03:36:54            1        0
192.168.1.22    4      64512       445       435        0    0    0 03:36:56            1        0
192.168.1.23    4      64512       445       435        0    0    0 03:36:56            1        0
192.168.1.24    4      64512       446       435        0    0    0 03:36:56            1        0
192.168.1.25    4      64512       445       435        0    0    0 03:36:56            1        0

Total number of neighbors 6
The following snippet of the routing table (ip route) tells us that for that specific ip address 172.16.10.0, 6 possible routes/destinations are present. In other words, all Kubernetes nodes announced that they can handle traffic for that address. Cool!!
172.16.10.0 proto bgp metric 20
	nexthop via 192.168.1.10 dev enp7s0 weight 1
	nexthop via 192.168.1.21 dev enp7s0 weight 1
	nexthop via 192.168.1.22 dev enp7s0 weight 1
	nexthop via 192.168.1.23 dev enp7s0 weight 1
	nexthop via 192.168.1.24 dev enp7s0 weight 1
	nexthop via 192.168.1.25 dev enp7s0 weight 1
Indeed, the web page is now visible from our router.
$ curl -s -v http://172.16.10.0/ -o /dev/null
*   Trying 172.16.10.0...
* TCP_NODELAY set
* Connected to 172.16.10.0 (172.16.10.0) port 80 (#0)
> GET / HTTP/1.1
> Host: 172.16.10.0
> User-Agent: curl/7.61.1
> Accept: */*
>
< HTTP/1.1 200 OK
< Server: nginx/1.21.3
< Date: Sun, 31 Oct 2021 14:19:17 GMT
< Content-Type: text/html
< Content-Length: 615
< Last-Modified: Tue, 07 Sep 2021 15:21:03 GMT
< Connection: keep-alive
< ETag: "6137835f-267"
< Accept-Ranges: bytes
<
{ [615 bytes data]
* Connection #0 to host 172.16.10.0 left intact
And a client in our client network can also reach that same page, since it uses bgp-router1 as default route.
More details
Now it is all working, most engineers want to see more details, so I will not let you down :)
ping
One of the first things you will notice is that the LoadBalanced ip address is not reachable via ping. Diving a bit deeper reveals why, but before that, let’s create the Cilium aliases to make it easier running cilium, which is present in each Cilium agent pod.
CILIUM_POD=$(kubectl -n kube-system get pods -l k8s-app=cilium --output=jsonpath='{.items[*].metadata.name}' --field-selector=spec.nodeName=k8s-master1)
alias cilium="kubectl -n kube-system exec -ti ${CILIUM_POD} -c cilium-agent -- cilium"
First see the output of this snippet of cilium bpf lb list, that shows the configured load balancing configuration inside Cilium for our Service *web1-lb`:
172.16.10.0:80       0.0.0.0:0 (5) [LoadBalancer]
                     10.0.3.150:80 (5)
Here you can see that a mapping is created between source port 80 and destination port 80. This mapping is executed using eBPF logic at the interface and is present on all nodes. This mapping shows that only(!) traffic for port 80 is balanced. All other traffic, including the ping, is not picked up. That is why you can see the icmp packet reaching the node, but a response is never send.
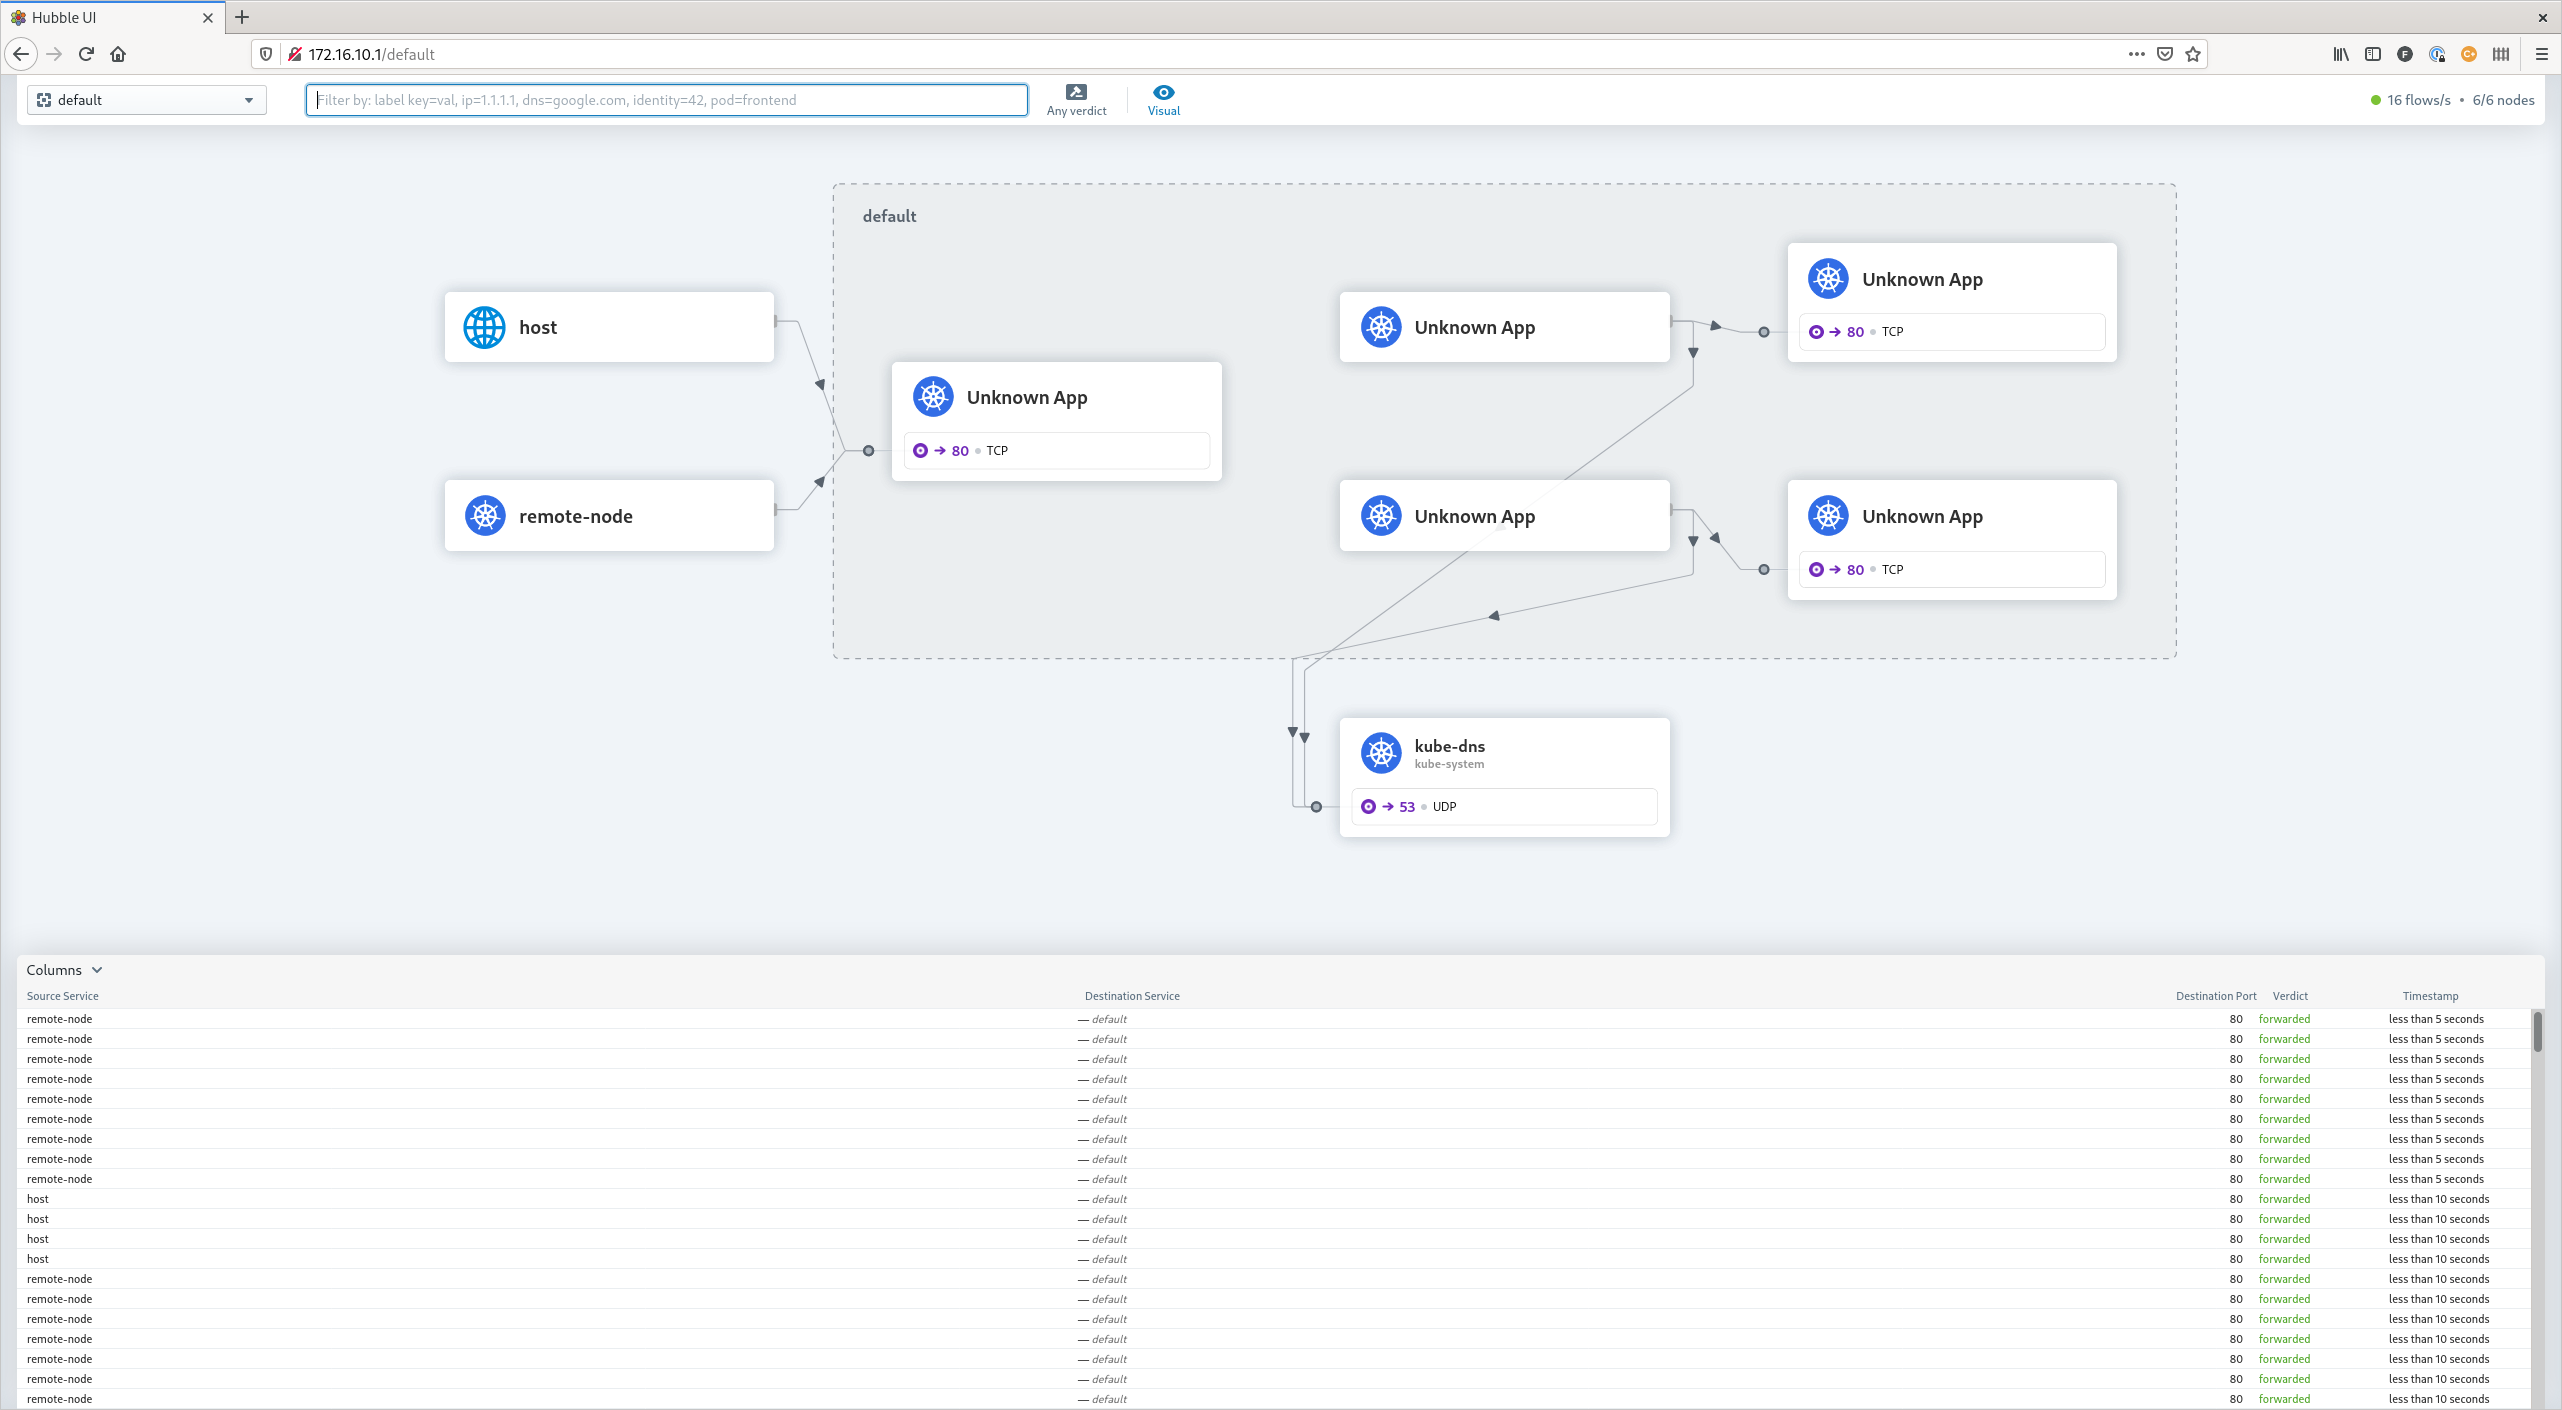
Observe traffic
Hubble is the networking and security observability platform which is built on top of eBPF and Cilium. Via the command line and via a graphical web GUI, it is possible to see current and historical traffic. In this lab, Hubble is placed on the k8s-control node, which has direct access to the API of Hubble Relay. Hubble Relay is the component that obtains the needed information from the Cilium nodes. Be aware that the hubble command is also present in each Cilium agent pod, but that one will only show information for that specific agent!
export HUBBLE_VERSION=$(curl -s https://raw.githubusercontent.com/cilium/hubble/master/stable.txt)
curl -L --remote-name-all https://github.com/cilium/hubble/releases/download/$HUBBLE_VERSION/hubble-linux-amd64.tar.gz{,.sha256sum}
sha256sum --check hubble-linux-amd64.tar.gz.sha256sum
sudo tar xzvfC hubble-linux-amd64.tar.gz /usr/local/bin
rm hubble-linux-amd64.tar.gz{,.sha256sum}
The following outputs show the observer information which is a result of the curl http://172.16.10.0/ command on the router.
$ hubble observe --namespace default --follow
Oct 31 15:43:41.382: 192.168.1.1:36946 <> default/web1-696bfbbbc4-jnxbc:80 to-overlay FORWARDED (TCP Flags: SYN)
Oct 31 15:43:41.384: 192.168.1.1:36946 <> default/web1-696bfbbbc4-jnxbc:80 to-overlay FORWARDED (TCP Flags: ACK)
Oct 31 15:43:41.384: 192.168.1.1:36946 <> default/web1-696bfbbbc4-jnxbc:80 to-overlay FORWARDED (TCP Flags: ACK, PSH)
Oct 31 15:43:41.385: 192.168.1.1:36946 <> default/web1-696bfbbbc4-jnxbc:80 to-overlay FORWARDED (TCP Flags: ACK)
Oct 31 15:43:41.385: 192.168.1.1:36946 <> default/web1-696bfbbbc4-jnxbc:80 to-overlay FORWARDED (TCP Flags: ACK)
Oct 31 15:43:41.386: 192.168.1.1:36946 <> default/web1-696bfbbbc4-jnxbc:80 to-overlay FORWARDED (TCP Flags: ACK, FIN)
Oct 31 15:43:41.386: 192.168.1.1:36946 <> default/web1-696bfbbbc4-jnxbc:80 to-overlay FORWARDED (TCP Flags: ACK)
Before, I warned about not using the hubble command inside the Cilium agent pod, but it can also be very informative seeing the specific node traffic. In this case a hubble observe --namespace default --follow is executed within each Cilium agent pod and the curl from the router is once executed. On the node where the pod is ‘living’ (k8s-worker2), we see the same output as the one above, However on another pod (k8s-worker1) we see the following output:
Oct 31 15:56:05.220: 10.0.3.103:48278 -> default/web1-696bfbbbc4-jnxbc:80 to-endpoint FORWARDED (TCP Flags: SYN)
Oct 31 15:56:05.220: 10.0.3.103:48278 <- default/web1-696bfbbbc4-jnxbc:80 to-stack FORWARDED (TCP Flags: SYN, ACK)
Oct 31 15:56:05.220: 10.0.3.103:48278 -> default/web1-696bfbbbc4-jnxbc:80 to-endpoint FORWARDED (TCP Flags: ACK)
Oct 31 15:56:05.221: 10.0.3.103:48278 -> default/web1-696bfbbbc4-jnxbc:80 to-endpoint FORWARDED (TCP Flags: ACK, PSH)
Oct 31 15:56:05.221: 10.0.3.103:48278 <- default/web1-696bfbbbc4-jnxbc:80 to-stack FORWARDED (TCP Flags: ACK, PSH)
Oct 31 15:56:05.222: 10.0.3.103:48278 -> default/web1-696bfbbbc4-jnxbc:80 to-endpoint FORWARDED (TCP Flags: ACK, FIN)
Oct 31 15:56:05.222: 10.0.3.103:48278 <- default/web1-696bfbbbc4-jnxbc:80 to-stack FORWARDED (TCP Flags: ACK, FIN)
Oct 31 15:56:05.222: 10.0.3.103:48278 -> default/web1-696bfbbbc4-jnxbc:80 to-endpoint FORWARDED (TCP Flags: ACK)
Oct 31 15:56:12.739: 10.0.4.105:36956 -> default/web1-696bfbbbc4-jnxbc:80 to-endpoint FORWARDED (TCP Flags: SYN)
Oct 31 15:56:12.739: default/web1-696bfbbbc4-jnxbc:80 <> 10.0.4.105:36956 to-overlay FORWARDED (TCP Flags: SYN, ACK)
Oct 31 15:56:12.742: 10.0.4.105:36956 -> default/web1-696bfbbbc4-jnxbc:80 to-endpoint FORWARDED (TCP Flags: ACK)
Oct 31 15:56:12.742: 10.0.4.105:36956 -> default/web1-696bfbbbc4-jnxbc:80 to-endpoint FORWARDED (TCP Flags: ACK, PSH)
Oct 31 15:56:12.745: default/web1-696bfbbbc4-jnxbc:80 <> 10.0.4.105:36956 to-overlay FORWARDED (TCP Flags: ACK, PSH)
Oct 31 15:56:12.749: 10.0.4.105:36956 -> default/web1-696bfbbbc4-jnxbc:80 to-endpoint FORWARDED (TCP Flags: ACK, FIN)
Oct 31 15:56:12.749: default/web1-696bfbbbc4-jnxbc:80 <> 10.0.4.105:36956 to-overlay FORWARDED (TCP Flags: ACK, FIN)
What we see here is that our router is sending the traffic for ip address 172.16.10.0 to k8s-worker1, but that worker does not host our web1 container, so it forwards the traffic to k8s-worker2 which handles the traffic. All the forwarding logic is handled using eBPF – a small BPF program attached to the interface will send the traffic and routes to another worker if needed. That is also the reason that running tcpdump on k8s-worker1, where the packages initially are received, does not show any traffic. It is already redirected to k8s-worker2 before it could land in the ip stack of k8s-worker1.
Cilium.io has a lot of information about eBPF and the internals. If you have not heard about eBPF and you are into Linux and/or networking, please do yourself a favor and learn at least the basics. In my humble opinion eBPF will change networking in Linux drastically in the near future and especially for cloud native environments!
Hubble Web GUI
With a working BGP set-up, it is quite simple to make the Hubble Web GUI available to the outside world as well.
kubectl -n kube-system expose deployment hubble-ui --type=LoadBalancer --port=80 --target-port=8081 --name hubble-ui-lb
Final words
Due to the integrated MetalLB, it is very easy to set up Cilium with BGP. Plus, you don’t need expensive network hardware. Cilium/BGP, combined with the disabling of kube-proxy, lowers the latency to your cloud based Services and gives a clear view of what is exposed to the outside world by only announcing the LoadBalancers ip addresses. Although an Ingress Controller is not required with this set-up, I still would recommend one for most HTTP Services. They have great value at the protocol level for rewriting URLs or rate limiting requests. Examples are NGINX or Traefik (exposed by BGP of course).
All in all, it is very exciting to see that cloud native networking, but also networking within Linux is still improving!