Reading our gasmeter with an Arduino
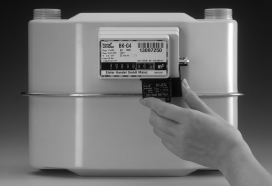
In our temporary home(*), we have a gas meter with a IN-Z31 pulse transmitter.I had never seen one before, so after some Googling, I found out that it is a reed switch, generating pulses when an event happens. This model have 2 switches, one for an alarm event, that is triggered when someone tries to tamper the meter and the other one that will be triggered when an amount off gas is used, the 'Totalizing contact'.
A cable with 4 wires coming from the IN-Z31 was not attached to anything, so we would not brake or interrupt something when we are trying to read information from it. The datasheet (IN-Z61 is a newer version, but working the same) showed me that the inner 2 wires of the 4 are used for the 'Totalizing contact', the one we need.
Two months ago I bought an Arduino Uno, because in our new home we want to do some domotica. Since we have the Arduino, our son Sven (14) had a lot off air time with it, so he helped me a lot to attach the IN-Z31 to the Arduino. Mostly, he build the board and I did the logic.
Board setup
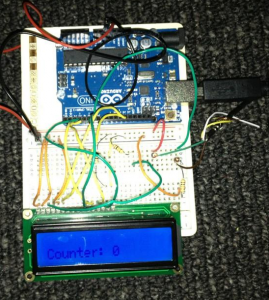
The setup on the board started simple, connect the 5v from the Arduino to one wire and connect the minus of the Arduino to the other wire. Between the wire from the IN-Z31 and the minus, we put a 10K resistor and behind the resistor we attach a wire to port 6 on the Arduino. Port 6 is a digital port, that means we are going to get a 0 (LOW) or a 1 (HIGH) from it. The part of the switch we are reading is normally open and will be close (making contact) when generating the pulse.
The datasheet mentioned that it will be 250ms closed. After connecting the IN-Z31 to the Arduino, we noticed that it triggered an event at every 0,001 m3. But after a lot of fiddling with the timing, we could not get a counter that was exact keeping up with the counters on the meter self. Eventually we decided not to measure the 0,001 m3, but 1 step further, so we count every 0,010 m3. What we did is the following, when we see an event from the reed switch, we append 1 to our counter and wait for 3500 ms (3.5 seconds). Why 3500?, 2500 (10 times 250 ms) was to low (the Arduino is so fast that we sometimes counted 2 extra loops in that 2500 ms ) and 3500 turned out to be a very good number :)
The code
After getting stable counters, Sven attached and LCD screen to the Arduino. That way we can leave it in the cabinet where the meter is, without a laptop attached to it, and still read out the information we want. When that worked, Sven did not liked it that the LCD was always on, so he also put a button switch between the LCD screen and the 5v, so that you need to press the button to read the screen, very nice!. The LCD part added some code and cables, but the base is very simple... You can download the code here
The future
Soon a Raspberry PI will arrive, then we will try to get the counters somewhere on the internet
*) We sold our home and are building a new one, so we now are renting a house on a holiday park in the neighbourhood of our new house